Hi guys...
Welcome to my blog... Toady I am going to teach you how to create simple calculator using android studio...
So let's start learning ....
Welcome to my blog... Toady I am going to teach you how to create simple calculator using android studio...
So let's start learning ....
Creating the project
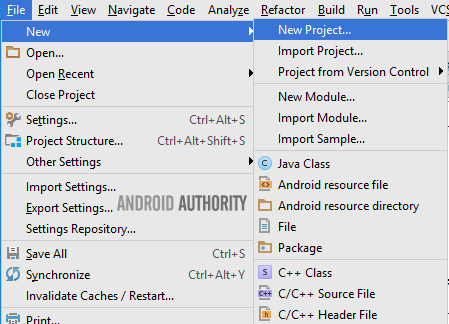
The first thing to do is create a new project by either clicking on “Start a new Android Studio project”, or ‘File -> New -> New Project’.
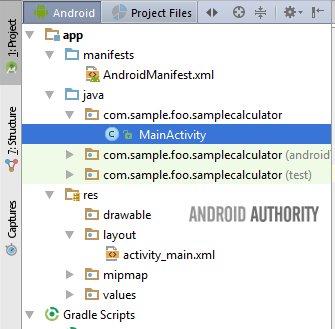
For this calculator tutorial, we selected the EmptyActivity option on the “Add an Activity to Mobile” screen, and left the Activity name as the default MainActivity. At this point, your layout hierarchy should look like the image below. You have a MainActivity within your project package, and an activity_main.xml file in the layout directory.
Enable data binding in your project
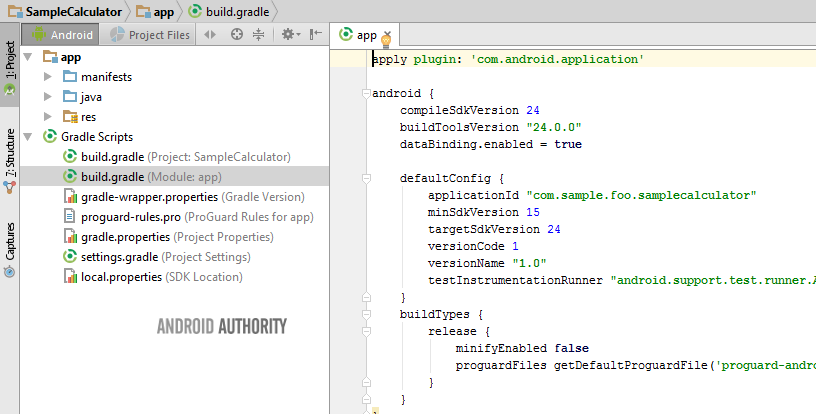
For our sample calculator, we will setup our project to use data binding. Using data binding in this app simply helps us refer to our widgets (Buttons, EditText and TextView) directly, rather than finding them with findViewById() methods. To enable data binding, you must add the following line to your app build.gradle file.
JAVASELECT ALL
android {
    ...
    dataBinding.enabled = true
    ...
Designing the Calculator layout
To enable data binding in our activity_main.xml file requires one last change. Wrap the generated root tag (in our case it was a RelativeLayout) within a layout tag, making the layout tag the new root tag.
XMLSELECT ALL
<?xml version="1.0" encoding="utf-8"?>
<layout>
    <RelativeLayout>
    ...
    </RelativeLayout>
</layout>
The layout tag is what alerts the build system that this layout file intends to use data binding. The build system then generates a Binding class automatically for this layout file. Since the target xml file is named activity_main.xml, the build system will generate a class called ActivityMainBinding, which you can reference in your app like any other Java class. The class name is generated from the layout file name by capitalizing the first letter of each word after an underscore, removing all underscores, and adding ‘Binding’ to the name.
At this point, switch to your MainActivity.java file. Create a private ActivityMainBinding instance within your class, and in the onCreate() method, delete the setContentView() line and replace with the DataBindingUtil.setContentView() line in the code snippet below.
JAVASELECT ALL
public class MainActivity extends AppCompatActivity {
    private ActivityMainBinding binding;

    @Override
    protected void onCreate(Bundle savedInstanceState) {
        super.onCreate(savedInstanceState);
        binding = DataBindingUtil.setContentView(this, R.layout.activity_main);
    }
}
Understanding the layout widgets
There are four main items in our calculator app. These are:
- RelativeLayout – this item governs how the other items are laid out, or displayed on the screen. The RelativeLayout is used to position child elements in relation to each other, or to itself.
- TextView – this item is used to display text. Users are not expected to interact with this item. The result of computations are displayed using a TextView.
- EditText – this is a kind of TextView that users can edit, and change the text. However, since the calculator allows only a fixed set of inputs, we set the edit text to be non-editable. When the user clicks on numbers, we display the numbers in the EditText.
- Button – this item allows interaction by the user, and ideally, should respond to clicks by the user. We use buttons for the numbers, and operators in the
- calculator.
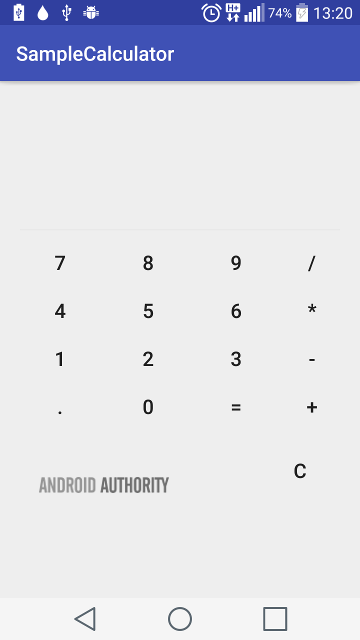
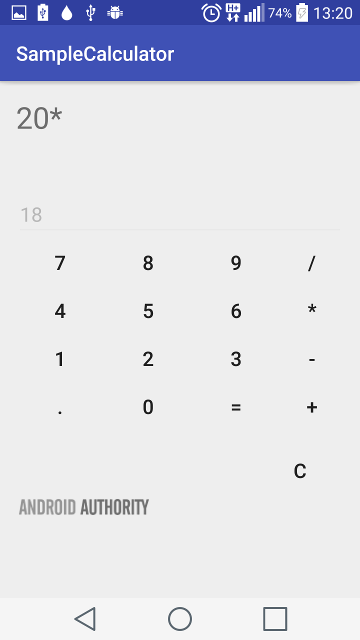
Building the Calculator layout
-
-
The calculator layout is a bit long. This is due to the fact that we have to explicitly define, and meticulously position, each of the buttons in the calculator. The snippet below is a condensed version of the activity_main layout file
-
XMLSELECT ALL
<layout>
<RelativeLayout xmlns:android="http://schemas.android.com/apk/res/android"
xmlns:tools="http://schemas.android.com/tools"
android:id="@+id/activity_main"
android:layout_width="match_parent"
android:layout_height="match_parent"
android:paddingBottom="@dimen/activity_vertical_margin"
android:paddingLeft="@dimen/activity_horizontal_margin"
android:paddingRight="@dimen/activity_horizontal_margin"
android:paddingTop="@dimen/activity_vertical_margin"
tools:context="com.sample.foo.samplecalculator.MainActivity">
<TextView
android:id="@+id/infoTextView"
android:layout_width="match_parent"
android:layout_height="wrap_content"
android:layout_marginBottom="30dp"
android:textSize="30sp" />
<EditText
android:id="@+id/editText"
android:layout_width="match_parent"
android:layout_height="wrap_content"
android:layout_below="@id/infoTextView"
android:enabled="false"
android:gravity="bottom"
android:lines="2"
android:maxLines="2"
android:textSize="20sp" />
<Button
android:id="@+id/buttonSeven"
style="@style/Widget.AppCompat.Button.Borderless"
android:layout_width="wrap_content"
android:layout_height="wrap_content"
android:layout_below="@id/editText"
android:text="7"
android:textSize="20sp" />
<Button
android:id="@+id/buttonEight"
style="@style/Widget.AppCompat.Button.Borderless"
android:layout_width="wrap_content"
android:layout_height="wrap_content"
android:layout_below="@id/editText"
android:layout_toRightOf="@id/buttonSeven"
android:text="8"
android:textSize="20sp" />
<Button
android:id="@+id/buttonNine"
style="@style/Widget.AppCompat.Button.Borderless"
android:layout_width="wrap_content"
android:layout_height="wrap_content"
android:layout_below="@id/editText"
android:layout_toRightOf="@id/buttonEight"
android:text="9"
android:textSize="20sp" />
...
...
<Button
android:id="@+id/buttonDot"
style="@style/Widget.AppCompat.Button.Borderless"
android:layout_width="wrap_content"
android:layout_height="wrap_content"
android:layout_below="@id/buttonOne"
android:text="."
android:textSize="20sp" />
<Button
android:id="@+id/buttonZero"
style="@style/Widget.AppCompat.Button.Borderless"
android:layout_width="wrap_content"
android:layout_height="wrap_content"
android:layout_alignRight="@id/buttonEight"
android:layout_below="@id/buttonTwo"
android:text="0"
android:textSize="20sp" />
<Button
android:id="@+id/buttonEqual"
style="@style/Widget.AppCompat.Button.Borderless"
android:layout_width="wrap_content"
android:layout_height="wrap_content"
android:layout_alignRight="@id/buttonNine"
android:layout_below="@id/buttonThree"
android:text="="
android:textSize="20sp" />
<Button
android:id="@+id/buttonDivide"
style="@style/Widget.AppCompat.Button.Borderless"
android:layout_width="wrap_content"
android:layout_height="wrap_content"
android:layout_alignTop="@id/buttonNine"
android:layout_toRightOf="@id/buttonNine"
android:text="/"
android:textSize="20sp" />
<Button
android:id="@+id/buttonMultiply"
style="@style/Widget.AppCompat.Button.Borderless"
android:layout_width="wrap_content"
android:layout_height="wrap_content"
android:layout_alignTop="@id/buttonSix"
android:layout_toRightOf="@id/buttonSix"
android:text="*"
android:textSize="20sp" />
<Button
android:id="@+id/buttonSubtract"
style="@style/Widget.AppCompat.Button.Borderless"
android:layout_width="wrap_content"
android:layout_height="wrap_content"
android:layout_alignTop="@id/buttonThree"
android:layout_toRightOf="@id/buttonThree"
android:text="-"
android:textSize="20sp" />
<Button
android:id="@+id/buttonAdd"
style="@style/Widget.AppCompat.Button.Borderless"
android:layout_width="wrap_content"
android:layout_height="wrap_content"
android:layout_alignTop="@id/buttonEqual"
android:layout_toRightOf="@id/buttonEqual"
android:text="+"
android:textSize="20sp" />
<Button
android:id="@+id/buttonClear"
style="@style/Widget.AppCompat.Button.Borderless"
android:layout_width="wrap_content"
android:layout_height="wrap_content"
android:layout_alignRight="@id/buttonAdd"
android:layout_below="@id/buttonAdd"
android:layout_marginTop="@dimen/activity_vertical_margin"
android:text="C"
android:textSize="20sp" />
</RelativeLayout>
</layout>
Calculator internals
Our calculator has two values, valueOne and valueTwo. These values hold the numbers to be operated on. Both values are of type double, so they can hold numbers with and without decimals. We set valueOne to the special Double value NaN (not a number) for reasons that will be clearer below.
JAVASELECT ALL
private double valueOne = Double.NaN;
private double valueTwo;
This simple calculator can only perform operations of either addition, subtraction, multiplication or division. So we define four static chars to represent these operations, and a CURRENT_ACTION variable, which holds the next operation we intend to perform.
JAVASELECT ALL
private static final char ADDITION = '+';
private static final char SUBTRACTION = '-';
private static final char MULTIPLICATION = '*';
private static final char DIVISION = '/';
private char CURRENT_ACTION;
Finally, we use the DecimalFormat class to format the output of our calculator. The decimal format constructor permits displaying up to ten decimal places.
JAVASELECT ALL
decimalFormat = new DecimalFormat("#.##########");
Handling button clicks (numbers)
Whenever the user clicks a number (or dot), we simply want to add that number to the editText. The code sample below shows how we accomplish this for number zero (0).
JAVASELECT ALL
binding.buttonZero.setOnClickListener(new View.OnClickListener() {
@Override
public void onClick(View view) {
binding.editText.setText(binding.editText.getText() + "0");
Handling button clicks (operators)
-
-
Handling clicks on operators is a little different. We would like to perform any pending computations first. So we define a computeCalculation method. Within computeCalculation, if valueOne is a valid number, we read valueTwo from the editText, and perform the current queued operation. On the other hand, if valueOne is NaN, valueOne assigned the number in the editText.
JAVASELECT ALL
private void computeCalculation() {
if(!Double.isNaN(valueOne)) {
valueTwo = Double.parseDouble(binding.editText.getText().toString());
binding.editText.setText(null);
if(CURRENT_ACTION == ADDITION)
valueOne = this.valueOne + valueTwo;
else if(CURRENT_ACTION == SUBTRACTION)
valueOne = this.valueOne - valueTwo;
else if(CURRENT_ACTION == MULTIPLICATION)
valueOne = this.valueOne * valueTwo;
else if(CURRENT_ACTION == DIVISION)
valueOne = this.valueOne / valueTwo;
}
else {
try {
valueOne = Double.parseDouble(binding.editText.getText().toString());
}
catch (Exception e){}
}
}
For every operator, we call computeCalculation() first, then set CURRENT_ACTION to the selected operator, while for the equals ‘=’ operator, we call computeCalculation(), then clear the contents of both valueOne and CURRENT_ACTION.
JAVASELECT ALL
binding.buttonAdd.setOnClickListener(new View.OnClickListener() {
@Override
public void onClick(View view) {
computeCalculation();
CURRENT_ACTION = ADDITION;
binding.infoTextView.setText(decimalFormat.format(valueOne) + "+");
binding.editText.setText(null);
}
});
binding.buttonSubtract.setOnClickListener(new View.OnClickListener() {
@Override
public void onClick(View view) {
computeCalculation();
CURRENT_ACTION = SUBTRACTION;
binding.infoTextView.setText(decimalFormat.format(valueOne) + "-");
binding.editText.setText(null);
}
});
binding.buttonMultiply.setOnClickListener(new View.OnClickListener() {
@Override
public void onClick(View view) {
computeCalculation();
CURRENT_ACTION = MULTIPLICATION;
binding.infoTextView.setText(decimalFormat.format(valueOne) + "*");
binding.editText.setText(null);
}
});
binding.buttonDivide.setOnClickListener(new View.OnClickListener() {
@Override
public void onClick(View view) {
computeCalculation();
CURRENT_ACTION = DIVISION;
binding.infoTextView.setText(decimalFormat.format(valueOne) + "/");
binding.editText.setText(null);
}
});
binding.buttonEqual.setOnClickListener(new View.OnClickListener() {
@Override
public void onClick(View view) {
computeCalculation();
binding.infoTextView.setText(binding.infoTextView.getText().toString() +
decimalFormat.format(valueTwo) + " = " + decimalFormat.format(valueOne));
valueOne = Double.NaN;
CURRENT_ACTION = '0';
}
});
Finally
If you run and use the above app, you will notice some possible areas of improvements, such as 1) click an operator when the editText is clear (i.e. without entering a number first), 2) allow the user continue calculating after clicking the equals button.
Comments
Post a Comment